Dappered

Affordable Men's Style

  • Don’t Miss Anything
  • Start Here
  • Essentials Shop
  • Latest Deals
  • Style Scenarios
  • Reviews
  • Forum

Classics: How to Iron – The Guy’s Guide

September 28, 2012 By Joe | Heads up: Buying via our links may result in us getting a commission. Also, we take your privacy rights seriously. Head here to learn more.

Black & Decker Iron – $33.34 | Shirt by ratio/clothing – $98.00

Originally Published 8/15/11. NOTE: I, personally, no longer use starch. I found that over time, I got better at ironing and didn’t need the starch to make the shirts as crisp & wrinkle free anymore. Your results may vary. If you do choose to use starch, just go easy.

Too many men get thrown out into the world without a single lesson on how to take care of their clothes.  If doing a load of laundry is like pumping gas, then ironing is like changing your oil.  It’s not easy at first, but once you get the hang of it, you’ll be able to do it in your sleep. 

The following is a 9-step guide and nothing more.  Those who already know how to iron well will have their own system, and those that don’t will develop one over time.  Try not to burn your place down.


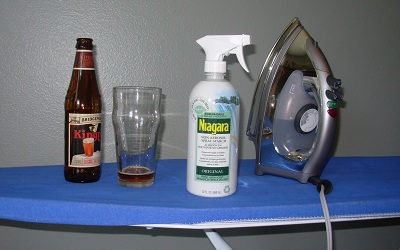
Step 1:  The Setup – First things first.  Open a beer.
The tools of this trade.

No reason that this can’t be at least a little enjoyable.  Pilsners and Lagers seem to go best with outdoor manual labor.  Beers that lean malty like ESBs or Reds seem to work better for the indoor chores.  Bridgeport Kingpin out of Portland is great if you can get your hands on it.  Bitch Creek from Grand Teton is a winner too.  Sam Adams Octoberfest gets the job done and is everywhere.  Oh, and you’ll need an ironing board, an iron, and light starch.


Step 2:  Prepping the Iron – You’re gonna need steam.
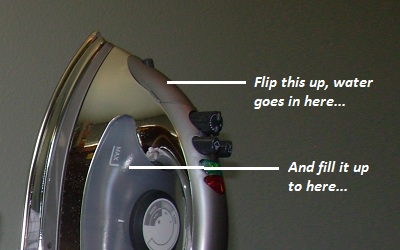
Water is completely key.

Pretty sure I lived on my own for at least two years before I realized that steam was a huge key to ironing.  Heat and only heat just doesn’t work.  Dumb?  Absolutely.  But no one has ever accused me of being a Rocket Surgeon.  Guaranteed others have made that mistake.  Tap water is ok, but if you have access to cheap distilled water or a Brita filter, use that to cut down on the risk of rust/calcium build up.  Once it’s filled, plug it in, turn it on, and let it heat up.


Step 3:  The Entertainment – Baseball, a favorite DVD, or something else…
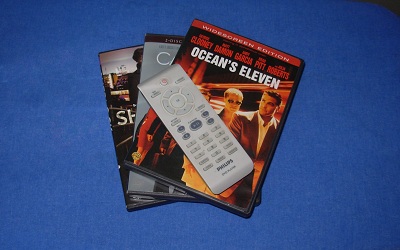
You want something you can enjoy, but ignore.

A lot of us can’t stand ironing.  So along with the beer, throw in one of your favorite movies, turn on a ball game, or listen to a podcast.  You want something that you only have to pay attention to marginally.  Your concentration will be on the ironing job, but, you still want an environment that’s somewhat fun and relaxing.


Step 4:  Assume the position – The board’s point goes to your non dominant hand side.
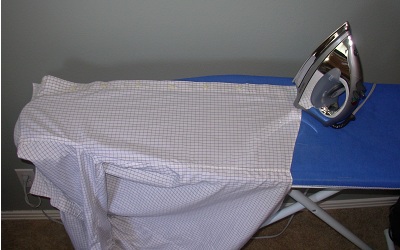
Are you a righty?  Point goes on the left.

Are you right handed?  The point should be on your left.  If you’re a southpaw, flip that around.  You’re going to want your dominant hand working the iron while threading the armpit of your shirts / crotch of your pants on the point.  Pulling the garment taught against the point will give you a flat surface to press, and having the iron on your right side (if right handed) gives you a place to put it that’s not covered by the shirt or pants.  Plus, you can manipulate the iron more easily by not working away from your body, but across it.  It’s like throwing a baseball or football.


Step 5:  Turning knobs, pushing buttons – Pick your temp setting and turn your steam up
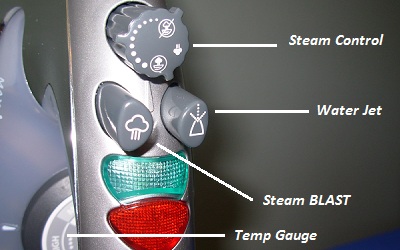
The wheel of your ship.

Most cotton garments can handle medium to medium high heat.  Read those labels.  Find your steam control knob and turn it up.  The steam blast button is like a spin move in Madden.  It’s your turbo boost.  You become Bo, the wrinkles are a Tecmo Bowl defense.  Use it at your discretion.  The water jet is for mistakes.  More on that later…


Step 6:  Ironing – Manipulating the garment and using starch
Shown: Step 4.  Rotate your shirt around the board.

Try and smooth out the wrinkles with your hand first to get a good flat surface.  You’ll develop (or have already developed) your own order on how you attack a shirt, but here’s just one example on how to do it:

  1. Left Front Half (without buttons) – Use a few light spritzes of starch
  2. Left Back – I skip the starch.  This is one advantage of always wearing a blazer or sportcoat
  3. Right Back – The shirt is being rotated around the board like a pig on a spit
  4. Right Front Half (with buttons) – A few more light spritzes of starch
  5. Right Back Sleeve – Smoothing out the wrinkles on sleeves takes practice.  Starch can help.
  6. Right Front Sleeve – You might find that you’ve ironed in creases here.
  7. Left Back Sleeve – Same as #5
  8. Left Front Sleeve – Same as #6
  9. The collar – Flare it out or keep it folded.  Up to you.  I’ll often do the collar in thirds to set the shape.
Step 7:  Getting out an ironed in crease – Using the water jet as an eraser
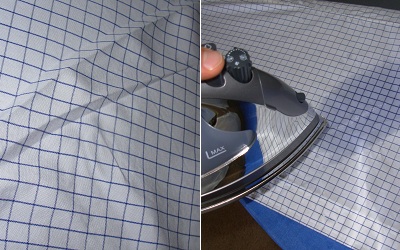
Creases require a soak.

One of the biggest pains is not getting part of a garment smoothed out correctly, and then accidentally ironing in a crease or wrinkle.  It happens, but the water jet button allows you to shoot a stream of water on your mistake which will soak it through, and then iron over it to dry and press that wrinkle out.


Step 8:  Choosing the Right Hanger – Or, avoiding the return of wrinkles
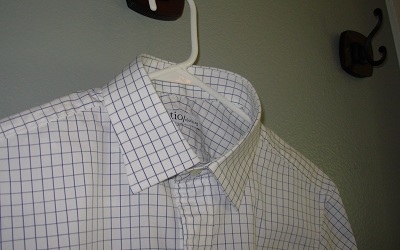
Sent to the shirt gallows

For shirts, a good plastic hanger will do.  Button the top one or two buttons.  Pants need a pants hanger (one of those cardboard covered wire hangers is fine.)  As soon as you’re done ironing it, hang it up.  The last thing you want is to re-wrinkle your stuff.


Step 9:  The Cleanup – Time to dock this showboat
Delicious, delicious ironing.

Most irons come with auto off features because, well, nobody likes a burned down house (unless you’re running some insurance scam.)  Turn your iron off, unplug it, and set it somewhere steady and safe to cool.  Put your ironing board away and hang your shirts in the closet.  You’d be surprised how long an ironing board can sit out if you you don’t do this right away.  Wipe hands on pants.  Look around and admire your handiwork.  Consider another beer.
.

Final Thoughts and Tips:
  • Don’t try to iron your blazers and sportcoats.  Take them to a dry cleaner or invest in a steamer.
  • Read your labels.  Don’t go high heat on a piece of clothing that can only handle medium.
  • Starch really is a miracle worker.  Heat-only is a unicycle.  Steam is a sports sedan.  Starch is a Ferrari.
  • Try and get in the habit of ironing right after your clothes come out of the dryer.  Set in wrinkles are tough.
  • Iron shown is a Black & Decker that gets killed in the online reviews, but I’ve had zero trouble with it.

Have any additional tips or questions?  Those all go in the comments section.  Here’s to wrinkle free…
Filed Under: Clothing, Dappered Classics, Etc. Tagged With: Beer, Guide, how to, How to Iron, how to take care of your clothes, Starch

Continue the Conversation …

Want to share your thoughts on this article? Send us a tweet, join the discussion on Facebook, or start a discussion on Dappered Threads, our forum!

Don’t Miss Anything

Subscribe via email to get articles in your inbox or add Dappered on Flipboard. You can also follow us on Twitter, Facebook, and Instagram. Or subscribe to push notifications to get alerts immediately.

New Here?

Well, welcome to Dappered. Here are what we consider the most useful posts on the site if you're looking to put a little more effort into your appearance. Just want to see our favorite menswear products? Shop our essentials here.

Steal Alert: The OG Nike Killshot (Navy Swoosh) is On Sale

Steal Alert: The OG Nike Killshot (Navy Swoosh) is On Sale

24% off. All sizes at post time. **rings dinner bell furiously**

10 Best Bets for $75 or Less – Shawl Collar Sweaters, Nerd Whimsy Art, & More

10 Best Bets for $75 or Less – Shawl Collar Sweaters, Nerd Whimsy Art, & More

Plus USA Made Hats, cheap cord truckers, etc…

In Review: Lorier Hyperion GMT Watch

In Review: Lorier Hyperion GMT Watch

We’re all staying put, but you can still wear the spirit of travel on your wrist

Follow Dappered on Instagram »

Comments

  1. Mdnicley says

    August 15, 2011 at 9:20 AM

    I, for one, learned quite a bit from this article… especially “point to left” and “water jet eraser.”

    It’s worth noting that cotton dress shirts DO NOT need to go to the dry cleaner (unless you really hate ironing.)

    As for starch (stolen directly from Brooks Brothers’ website) “Used regularly, it’s a substance that will shorten a shirt’s working life and cause, over time, an unpleasant change to both the appearance and feel of a fine cotton shirt. Remember, starch is basically a glue… if you wouldn’t smear library paste on your shirt yourself, don’t pay someone to do it at the laundry”

  2. Ryan N. says

    August 15, 2011 at 12:57 PM

    First – the tagline would definitely sound better as “..from wrinkled mess to perfect press.” FYI.

    Second – am I the only one that hates buttoning the top button when hanging? It seems that I always have my collar fold over at the button when I do this, so I often opt for the second button and leave the top undone. Maybe it’s just me.

  3. Joe says

    August 15, 2011 at 1:40 PM

    Glad you enjoyed it.  Per the starch:  I think there’s a big, big difference between one and a half to two quick spritzes on a shirt with a non aerosal starch like Niagra, and the machined process used at a dry cleaner.  The very few times I’ve paid to have shirts laundered (it’s way too rich for my blood) and asked for “light starch” you can totally tell they’ve starched them.  Not the case with just a couple of assisting, barely-there-mists from the Niagra.

    Also, the hell is “library paste”?  Is that Elmer’s?

  4. TheBarNone says

    August 15, 2011 at 2:10 PM

    Library past is the stuff that smells like mint but tastes like crap.

  5. Anotherjames says

    August 15, 2011 at 2:46 PM

    BTW Sam Adams Octoberfest is a Lager.  Octoberfest beers are Marzenbier’s, those lagers that are made in March (Marzen), cellared (lagered) all summer, and then served in Autumn (October).  A bit rich and sugary, their too cloying for my taste.  This is due to the subtle and low hop content characteristic of lagers, that would otherwise provide bitterness to balance out malt’s sweetness. 

    /queue “The More You Know” music and rainbow.

  6. Anotherjames says

    August 15, 2011 at 2:46 PM

    *edit – “their”;”they’re”

  7. Anonymous says

    August 15, 2011 at 3:09 PM

    Good article.

    I was also taught to keep a handkerchief handy for more delicate items. My preferred method is with a steamer, but many hotel rooms don’t have one. I will wet a handkerchief (so it’s damp but not dripping) and iron through it. Never go all the way to the edge, don’t apply extra pressure (let the iron’s weight do it), and keep the temperature as low as you can. This gives me added steam where I need it and doesn’t leave a “shine” that can happen when the temperature or pressure is too high.

    My most frequent use of this is on a suit lapel or jacket front. I have also brought ties back to life this way.

    Please note that a) I usually spend <$15 on a tie (most expensive one I own is $50) and b) I take this risk knowing I may damage it. That being said, I have never damaged a tie or suit with this method. This is not a replacement for dry cleaning (always dry clean your suits or ties), just a way to touch up parts of an item when you're pressed for time.

  8. Ryan N. says

    August 15, 2011 at 3:11 PM

    Heh, “pressed” for time.

  9. Dan Patrick Flores says

    August 15, 2011 at 4:01 PM

    I always enjoy the NES references, the Tecmo Bowl here and the Ice Hockey one a while back. Awesome.

  10. Joe says

    August 15, 2011 at 4:18 PM

    Well I’ll be.  To most of us, Lager = Bud, and I was going more on the taste variations.  I’m not exactly on BeerAdvocate rankin’ the “lacing” on the head, but I do know what I like.  But regardless, thanks for the knowledge.

  11. Na Humma says

    August 15, 2011 at 4:19 PM

    Nice article, Joe. You gave me some new things to consider when I crack out the ironing board again and I can’t agree with you more at the power of beer to make mundane tasks far more interesting (or at least bearable…).

  12. HKH says

    August 15, 2011 at 4:52 PM

     I take the collar-stays out before I iron the collar. Sometimes you can get imprints if you iron over them.

  13. Anonymous says

    August 15, 2011 at 4:53 PM

    My advice is always get a Rowenta.

  14. MarkC says

    August 15, 2011 at 5:39 PM

    Good article. I need to pick up some of that starch and some more beer.

    A good tip Ive been using if shirts are complete dried and wrinkled is lightly spray entire shirt with water bottle until damp. Let sit for 2 minutes and iron.

    Also, the order is a matter of preference, but I used to hate ironing until I started doing it this way. Able to get the shirt PERFECT and done quickly.

    1. Right Cuff
    2. Right Sleeve
    3. Left Cuff
    4. Left Sleeve
    5. Shoulder
    6. Collar (flat from back, then fold and press middle of collar only from front) then button first button and continue
    7. Left front
    8. Left back
    9. Right back
    10. Right front

    and done. Key is leaving collar buttoned. Keeps crisp and shirt in order when turning around the board. Hang with at least the top collar buttoned and let shirt cool off and completely dry (preferably for longer than an hour for the crispness to set in). If shirt is damp from either spray bottle or steam, it will wrinkle very quickly.

  15. tim in boise says

    August 15, 2011 at 5:45 PM

    This is a perfect example of why I love Dappered. Thanks for this. I really needed it.

  16. Dandy Fop says

    August 15, 2011 at 8:08 PM

    I could swear that shirt has been in at least 10 articles now. Joe, could you please change your clothes?

  17. Cannon says

    August 15, 2011 at 8:34 PM

    I hope out of those DVDs you chose to put the Casino Royale disc in the player. (Favorite Movie)

    I started trying to learn ironing last week for college. These are good tips for a beginner like me.

  18. Joe says

    August 15, 2011 at 8:39 PM

    It needed to be ironed because I wore it to the god*amned car wash.

  19. Alan says

    August 15, 2011 at 9:10 PM

    While living in Germany I ended up with an Austrian roommate for a couple months who had finished an apprenticeship as a tailor.  Pros & cons:  he was a stubborn Austrian with no sense of humor, but he spoke no English so I got to practice my German and he taught me how to iron – not to mention free at home alterations.  He taught me to ALWAYS iron with a scrap piece of material (prefer white) over whatever you iron.  If you get carried away the scrap will scorch, not your clothes and if it’s wet it will provide steam as mentioned above.  Iron areas of a shirt where material is doubled (i.e. yoke, collar cuffs) first then do the rest of the shirt however makes sense to you.  With the collar you need to iron it in thirds:  first the fronts to the middle and last the back.  Flat doubled material going in a circle means excess material that will end up with creases if you iron from one side straight to the other.  He probably said other stuff but I was ignoring him by then.

  20. bigtime says

    August 15, 2011 at 10:17 PM

    Beer leads to carelessness.  Pre-cleaning bong hit == success.

  21. Ben says

    August 16, 2011 at 3:39 AM

    Great article . . for newbies. 

    If you are “really” dapper you would have passed up civilian irons long ago. They simply do not put enough steam. It really is all about the steam. Dont bring knives to gun fights so dont bring weak irons to your clothes pressing needs.

    Once you are really to step your ironing game up you will goto this:

    http://www.reliablecorporation.com/Products/Home-Irons/IronMaven-J420_2

    This company makes irons from $200 to over $5000. Your local cleaners will have Reliable irons because they put out an insane about of steam and last forever. 

    The IronMaven is $250 and its their entry “pro” level steamer. Technically its a “stream generator” meaning it uses a boiler that creates both steam and pressure. Your home iron simply puts water on the heated plate element which means there is zero pressure. Zip. Nada. Zilch.

    Using steam as well as pressure makes all the difference. Winkles simply dont have a chance. They bow and disappear in complete and utter submission. 

    With pressure you simply move the iron once over the area and the winkles are gone. No moving back and forth over and over again. Once you get the hang of it you can iron shirts in one or two minutes. Your shirts will be as stiff and rigid as your high school mornings. 

    $250 for an iron? No. Its pays for itself in the time it saves and the professional look if gives you without going to the dry cleaners. Its the same equipment they use! 

  22. KG says

    August 16, 2011 at 4:58 AM

    I’m with you…I always go with the second button.  Glad other people waste time wondering about these sorts of things and I am not alone.

  23. Gisforgiraffe says

    August 16, 2011 at 11:09 AM

    Late to this show.

    I was always taught to turn my shirts inside out.  Anyone have any thoughts about that?

  24. Joe says

    August 16, 2011 at 11:22 AM

    Count me in the group of those that aren’t “really” dapper then.  Spending $200 on an iron seems, um, a lot.  I don’t love wrinkles, but… I don’t hate em’ that much by any means either.

  25. Ryan N. says

    August 16, 2011 at 1:36 PM

    Lager = Yuengling!

  26. MarkC says

    August 16, 2011 at 2:40 PM

    Agreed. But if I could knock out a shirt in less than 2 minutes, itd almost be worth it.

    I usually save all my ironing for one day.  Thats hours of ironing. Despite beer and a good movie, Id rather not be ironing longer than the movie lasts

  27. MarkC says

    August 16, 2011 at 2:40 PM

    Agreed. But if I could knock out a shirt in less than 2 minutes, itd almost be worth it.

    I usually save all my ironing for one day.  Thats hours of ironing. Despite beer and a good movie, Id rather not be ironing longer than the movie lasts

  28. Joe says

    August 16, 2011 at 3:53 PM

    Hours?  Wow… that’s a lot of ironing.  But if you’re in a shirt and tie, every day, I can see how that’d be a possibility.  I think I can knock out 6 shirts and three pairs of pants in maybe 30-45 minutes.  But full honesty here, I’m not the world’s most precise iron…er…

  29. Derek says

    August 16, 2011 at 7:11 PM

    I just learned how to iron for the first time last month. I am 27.

  30. Chriss says

    August 17, 2011 at 3:46 AM

    What are your thoughts on steam presses such as this:

    http://goo.gl/z5bxR

    I know a fellow (US diplomat, actually) who uses one regularly and swears by it. Not as precise as an iron, but with practice I bet it could just as good.

  31. TallEnglishman says

    August 18, 2011 at 8:34 PM

    By way, I’d like to echo a comment earlier about a water spray bottle.  It means the water in the iron goes much longer.

  32. Johnny says

    August 26, 2011 at 5:07 AM

    I agree with what you wrote but my ironing plan is a little different. Try to take the shirt out of the dryer while its still a little damp. This will give the best results without the need of starch or much spraying of water. Start with the smaller sections first because the sections you are not working on tend to wrinkle up while ironing other parts.

    1. Collar – lay flat wrong side up ironing from points to center. Then flip over and iron the same direction on the right side/outside.
    2. Yoke (shoulders)
    3. Cuffs – Iron the insides then do the outsides
    4. Sleeves – smooth sleeve and iron one side then flip over to iron the other side. Move on to the other sleeve.
    5. Back – Do the entire back at once on the large part of the ironing board.
    6. Front panels – start with the pocket then do the panels
    7. Retouch – Retouch the collar if needed. This is the smallest section so a retouch is rare, very quickly done and only needed on the outside.

    I couldn’t agree more about hanging shirt until cool & dry before putting it away. That sets in the crispness.

    When looking at my list above just ask yourself what is the most important parts to have wrinkle-free? The answer is the front. Which is why the front panels are ironed last. Also why you iron the collar from the points to center and retouch if needed. Sleeves will wrinkle shortly after putting the shirt on so they are less important than the back.

  33. Anonymous says

    August 26, 2011 at 5:15 AM

    You can’t go wrong with inside out. Its the safe way to iron.

    Inside out is excellent advice if you have fabric that may leave that sheen behind. You can iron on higher heat on the inside because you aren’t worried about creating that shine if the heat is too high. The iron shine effect is why some professional places use a small piece of fabric (pressing cloth) between the iron and your garment when pressing/ironing.

  34. Anonymous says

    August 26, 2011 at 5:17 AM

    I’ll second that comment. A separate spray bottle will also give a better spray than the nozzle on the iron.

  35. Bwp1984 says

    October 17, 2011 at 8:24 AM

    So, I realize that i’m late to this comment thread, but I’m new to the site and just saw this.  One shortcut I’ve done with my shirts is to iron them when they come out of the wash; I iron them with just heat, using the damp shirt to create the needed steam.  Doing this also dries them almost completely; when I finish ironing, I leave them hanging in a doorway or somewhere to finish drying.  By ironing this way, my shirts are cleaned, almost dry, and well-pressed, all in under an hour.  

  36. Johdus says

    September 28, 2012 at 6:29 AM

    The Johdus guide to ironing:

    Step 1: Drop shirts off at cleaners.
    Step 2: Go home and open beer.

  37. Jordan says

    September 28, 2012 at 6:57 AM

    Enter the hopheads.

  38. rambler63 says

    September 28, 2012 at 7:57 AM

    I’ve taken to leaving my ironing for Saturdays and Sundays where I can have football on in the background. I’d love to drop all my shirts off at the cleaners, but if iron 10 shirts while watching a football game one afternoon, I feel pretty good about saving $20 and not sitting around all day. Double win!

  39. SDot says

    September 28, 2012 at 8:18 AM

    I disagree with some of the techniques you’ve posted, but hey…everybody does things their own way. Technically no “right” way. But I always reference this video from T.M. Lewin…haven’t come across a better technique.
    http://community.tmlewin.com/videos/how-iron-shirt

  40. Joe says

    September 28, 2012 at 8:53 AM

    This is more of an observation than a throwing of the hands up and shaking head reply:

    I find it interesting that the internet has gotten to the point where someone has to say they “disagree” with ironing techniques.

    You said it yourself. There is no right or wrong way.

    Thanks for the link to the video though. Seen that one before. Guy is passionate about his shirts.

  41. Joe says

    September 28, 2012 at 8:54 AM

    YES. This. I as well.

  42. aglass says

    September 28, 2012 at 9:05 AM

    Great stuff here – anyone have thoughts on pants? I have no issue ironing my shirts, but whenever I do my pants I can never hit exactly on the same crease on the legs / have trouble with bunching in the waist.

  43. Zac M. says

    September 28, 2012 at 10:10 AM

    I tried that once, it was awful. I Took about a dozen shirts to the cleaner to be pressed with medium starch. They pressed the cuffs while buttoned which gave it wierd points rather than a smooth circle and there were imprints where they pressed over the buttons. The collars gets a boxy shape, again like they pressed it buttoned. Overall it seemed like they did a sloppy job, small wrinkles and bad creases all over. I ended up having to re-iron every shirt I gave them which seems to defeat the purpose and waste money.

  44. Damion says

    September 28, 2012 at 10:26 AM

    This video should probably come with a “Do Not Try This At Home!” warning…but the man is a craftsman.

    http://www.youtube.com/watch?v=ylQtbXFZ4yw

  45. Damion says

    September 28, 2012 at 10:32 AM

    And due to the fact that your audience likely enjoys these types of videos (and likely has already seen them long ago), here’s one of a guy shining shoes, as is indicated in the title, like a boss.

    http://www.youtube.com/watch?v=SrzNkhJsJm8&feature=relmfu

  46. zerostyle says

    September 28, 2012 at 11:26 AM

    Misting the entire shirt with water first is the best tip I ever found in the past. It really helps get the wrinkles out better.

    Here’s the order I personally iron my shirts in:
    1. Collar (don’t iron the part closest to the shirt though if you want a better roll)
    2. Sleeves and cuffs (usually only one side of the sleeve to save time)
    3. Yolk (though I often skip this)
    4. Back-right
    5. Back-left
    6. Front-left
    7. Front-right

    I find it’s best to do the front last since you may end up wrinkling it while trying to do the tougher parts.

  47. Johdus says

    September 28, 2012 at 1:10 PM

    Sounds a ‘lil too ocd for me.

    All I care is that they don’t look like a ragged bunch of cotton.

  48. Ned says

    September 28, 2012 at 3:13 PM

    You should probably take the collar stays out before you wash the shirt, IMHO.

  49. Shrike says

    September 28, 2012 at 3:35 PM

    I agree this is a great way to do it – especially when you look over and see all your shirts in one big colour spectrum.

    The issue I have with this is that they usually need that last bit of hang drying, and I worry that even indoors the sun can get in and fade the fabric.

    OCD, I know because we all spend at least 20 min outside anyway, but the fear is there.

  50. Brian says

    September 28, 2012 at 8:19 PM

    A problem when using tap water and the “steam blast” — if you live in a place with hard water (i.e. calcium and other mineral deposits) the steam blast setting always seems to impregnate little white flakes in the shirts. I don’t know what the practical solution is to that (not using it?) but they’re a pain to take out, and if you’re ironing a non-white shirt to look sharp, you instead look like the “before” in a head and shoulders commercial.

  51. Michael_Walters says

    September 28, 2012 at 10:52 PM

    Thanks Joe, not everybody gets to learn to iron the way I did (USMC). Technique is basically the same, except I used a water bottle to mist instead of light starch (I just don’t like starch). For creases I rub a little Ivory soap on the inside of the shirt before I iron the crease.
    Steamers are great. We bought a Jiffy steamer years ago for our business and ended up keeping it in the house. Very useful for freshening up suits and jackets.

  52. eeyore says

    September 29, 2012 at 11:40 PM

    The best order to me is:

    Collar, cuff, sleeves, back, front. A lot of people put the sleeves last, but I find the sleeves never get wrinkled when I do the rest of the shirt, but the front gets wrinkled when I do the sleeves, and that’s the worst part to get wrinkled. So try it my way next time you get frustrated guys.

  53. Michael_Walters says

    September 30, 2012 at 11:15 AM

    Buy distilled water just to use for that purpose. We do the same thing (and also for our steamer). A gallon jug will last a long time. You may have to ditch your old iron as the minerals may take a while to come out of the reservoir.

  54. Matthew Petty says

    May 15, 2013 at 4:58 PM

    Be careful when buying the ironing board – don’t buy the cheapest in the shop. It will flex and buckle and you’ll end up hating and replacing it.

Men’s Fashion or Affordable Style?

Men's Fashion or Affordable Style?

Fashion is temporary and expensive. Style is timeless and affordable. Dappered® helps you work the retail system so that you can be comfortable, look sharp, and save money.

Want to share a great product? Email Us.
Continue the discussion at Dappered Threads.
For a fit perspective, see Joe's measurements.
Make sure to read our affiliate disclosure.

Connect with Dappered

  • Facebook
  • Instagram
  • Pinterest
  • RSS
  • Twitter

Most Popular on Dappered

  • Steal Alert: Nordstrom Extra 25% off Sale Items Clearance Blowout
  • adidas End of Season, Allen Edmonds Warehouse Sale, & More – The Thurs. Men’s Sales Handful
  • TUESDAY Men’s Sales Tripod – Bronze Watches, Allen Edmonds Sneakers, & More
  • Best Posts of 2020: A lot of watches, some shoes, and being a stylish dad
  • 10 Best Bets for $75 or Less – Shawl Collar Sweaters, Nerd Whimsy Art, & More
  • On Martin Luther King Jr. Day

Popular Topics

  • Best dress shirts to own
  • Best looking watches under $100
  • Best men’s dress shoes under $200
  • Nike Killshot sneaker alternatives
  • How to wear a suit without a tie
  • Suitsupply store review
  • Suitsupply Blue Line review
  • J. Crew Factory Thompson suit review
  • How much does it cost to tailor a suit?
  • Dopp kit essentials
  • Brown shoes with gray pants
  • Men’s style buying guide

RSS Latest on Dappered Threads

  • after 11 years, finally bought those chukkas from the dappered front page :-D
  • Recommendations on American Made Denim (for my Wife)
  • AE Dalton too stiff
  • SuitSupply Linen Tuxedo
  • hiking shoes for AE dress shoe dress boot guy.

Copyright © 2021 Dappered.com | Dappered, LLC | Dappered® is a registered trademark of Dappered, LLC

Hat tip: Magazine Pro Theme On Genesis Framework

Dappered does not collect or sell its users personal information | Disclosures: Privacy and Affiliates, Gilt.com, FTC

WPE

We work with partners that use cookies to understand how visitors use our site. Find out more.